TL;DR
Start with a correctly framed photo for an application that requires 2×2 inches. Place it at exactly 2×2 inches on a 4×6 inch canvas, print without scaling or automatic crop, and measure each finished photo. Six copies fit only as an edge-to-edge mathematical layout; printer margins and borderless enlargement can make that unreliable. Two centered copies allow margins on all sides. IDPIC’s current print-layout PDF is A4, so do not shrink that PDF onto 4×6 paper.
Check the passport requirement before creating a print sheet
This guide covers printing a photo for a workflow that asks for 2×2 inch paper photographs, such as the U.S. passport paper application. It is not a universal rule for every passport or visa. If your application requires 35×45 mm, a different print size or a digital upload, follow that requirement instead.
The U.S. Department of State lists a 2×2 inch print, with the head measuring 1 to 1⅜ inches from chin to top of head. It also requires a recent color photo and the original, unchanged image. A print layout cannot fix a turned head, shadows, blur or prohibited editing. Review the official photo guide before arranging copies.
Understand 4×6 paper, 2×2 photos and pixel dimensions
A 4×6 inch sheet measures 101.6×152.4 mm. A 2×2 inch square measures 50.8×50.8 mm; official U.S. guidance rounds that to 51×51 mm. Keep the intended inch dimensions rather than repeatedly converting rounded values. Also check the actual paper package: paper sold as 10×15 cm is not mathematically identical to 4×6 inches.
At an example export resolution of 300 pixels per inch, a portrait 4×6 canvas is 1200×1800 pixels and each 2×2 photo is 600×600 pixels. These are layout calculations, not a universal government upload specification. Pixel count alone does not lock physical print size if the printer or photo service scales the image.
Six copies fit only without margins
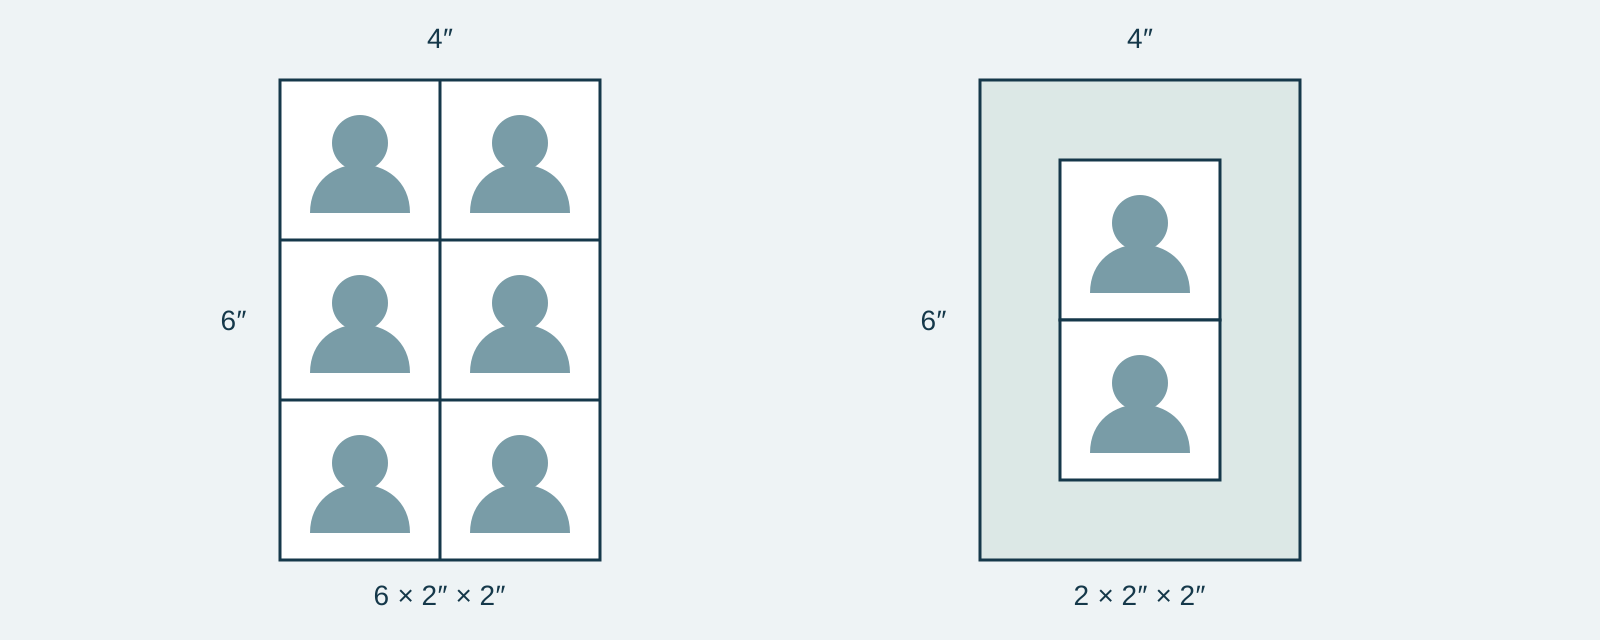
On a portrait sheet, two columns by three rows of 2×2 photos occupy exactly 4×6 inches. This six-copy arrangement leaves no outer margins and no gaps. It works only if the printing process preserves the entire canvas at the requested physical size. A printer that requires margins may shrink or clip it; a borderless mode may enlarge it to bleed beyond the paper.
Do not assume a six-copy sheet works on every printer. Confirm the actual printable area and expansion behavior, then make a test print. The number of copies is a layout choice, not evidence that the final dimensions are correct.
Use two centered copies when you need margins on every side
Four unrotated 2×2 squares in a two-by-two arrangement occupy the entire 4-inch side, even on a landscape 6×4 canvas. There is no way to fit four such squares with positive outer margins on every side of a true 4×6 sheet.
For positive margins on every side, choose two copies: on a portrait 4×6 canvas, center one column of two 2×2 photos. With no gap, this leaves 1 inch on the left and right and 1 inch above and below. You can add a modest gap by reducing the top and bottom margins, without changing the photo size. Choose the layout according to the printer’s actual printable area.
Export the sheet without changing the individual crop
Prepare the source photo first, then place copies into the layout at a fixed physical size. Do not stretch a face to fill a square, add borders inside the final photo or let a collage tool zoom automatically into each tile. Keep any cutting marks outside the photo areas so they can be removed completely.
A PDF with a true 4×6 page can preserve intended dimensions when printed at actual size. A JPEG sheet can also work if the receiving service prints the whole canvas at exactly 4×6 without a crop. Confirm accepted file types with that service. Renaming a file extension does not convert its format. Keep the original photo and a separate print-sheet file.
Print at actual size and inspect borderless settings
Select the correct paper size and orientation. Use 100% or actual size where the print dialogue provides it, and disable fit to page, fill frame, automatic cropping and any photo enhancement that changes the portrait. Labels differ between printer drivers and photo kiosks; inspect the preview and ask the operator if the scaling behavior is unclear.
Borderless printing is not automatically exact-size printing. Many drivers enlarge the image beyond the paper edges to avoid white borders, which enlarges the photos too. Look for expansion settings, choose a layout with safe margins when possible and make a test print. If you use a shop, state that each individual photo must remain 2×2 inches and ask whether its system crops or enlarges uploaded sheets.
Measure, cut and check the finished photographs
After printing, measure the width and height of each photo area with a ruler. Check the head framing against your application’s rules as well: a 2-inch outer square does not prove the face has the right size. Inspect sharpness, color, shadows, visible pixels and surface marks. Use photo paper suitable for the receiving authority’s requirements rather than ordinary office paper.
Cut along the intended edges without leaving marks or trimming into the photo. If the dimensions are wrong, correct the print settings and print again; do not try to compensate by cutting away part of the face or stretching the file. Save the remaining copies cleanly and check how many your actual application asks for.
Using IDPIC files without confusing A4 and 4×6
IDPIC’s current print-layout PDF uses an A4 page and is labelled for printing at 100% or actual size on A4. It is not a 4×6 template. Sending that page to a printer with fit-to-4×6 enabled shrinks both the sheet and every individual photo, so it does not preserve a 2×2 print.
If your selected option includes a digital photo, you can arrange that file separately on a true 4×6 canvas using suitable layout software, then follow the checks above. Confirm what your purchase includes before downloading. IDPIC supplies preparation and downloadable files, not physical printing or delivery, and cannot guarantee the result of a printer or a passport authority. Cloud photos follow the published 7-day unpaid and 30-day paid policy, with earlier user-initiated deletion available.
Key data at a glance
| Item | Dimensions | What to verify |
|---|---|---|
| Paper | 4×6 in = 101.6×152.4 mm | Match the real paper, not a similar preset |
| Individual photo | 2×2 in = 50.8×50.8 mm | Measure after printing |
| Example at 300 ppi | Sheet 1200×1800 px; photo 600×600 px | Do not allow automatic scaling |
| Six-copy layout | 2 columns × 3 rows, zero margins | Check clipping and borderless expansion |
| Two-copy layout | 1 column × 2 rows, centered | Leaves margins on all sides |
Frequently asked questions
How many 2×2 photos fit on 4×6 paper?
Six fit mathematically in a two-column, three-row layout, with no margins or gaps. Real printers may crop or enlarge that layout. For margins on every side, two centered copies are a safer starting point.
Is 10×15 cm paper exactly 4×6 inches?
No. A true 4×6 inch sheet is 101.6×152.4 mm, while 10×15 cm is 100×150 mm. Select the paper size actually in the printer and preserve each photo’s required dimensions.
What pixel size should the sheet use?
At an illustrative 300 pixels per inch, a portrait 4×6 sheet is 1200×1800 pixels and a 2×2 photo is 600×600 pixels. These are print-layout calculations; the receiving application may have different digital upload rules.
Why are my passport photos smaller after printing?
Fit-to-page scaling, selecting the wrong paper size or shrinking an A4 PDF onto 4×6 paper can reduce every photo. Print at actual size and measure a test print rather than relying only on the preview.
Can I use IDPIC’s A4 print PDF on 4×6 paper?
Do not shrink the A4 PDF to 4×6. Print it at actual size on A4, or use the digital photo, if included, to create a separate true 4×6 layout.
Does a correctly sized print guarantee acceptance?
No. The portrait, head framing, paper quality and other requirements must also meet the current issuing-authority instructions. A printer preview or a software check is not official approval.
Example scenario
The square looks right but measures less than two inches
An applicant sends an A4 photo-layout PDF to a printer set to 4×6 with fit to page. The small photos look square but measure too small. The applicant prints the A4 PDF on A4 at actual size, or rebuilds a separate 4×6 sheet from the digital photo and measures a new test print.
Sources & References
Public change history
Added practical 4×6 print sizing and margin calculations.
Documented the current A4 PDF boundary and post-print checks.